|
CopyMove can also be installed and deployed manually to a SharePoint farm. You can use this approach if you are experiencing any problems with the supplied PowerShell scripts for installing, upgrading and uninstalling CopyMove. To manually install and deploy CopyMove, follow the steps below:
| 1. | Login to the SharePoint server with a local administrator account that have also been granted the db_owner role on the SharePoint configuration database and the SharePoint administration content database. If your SharePoint installation is a multi-server farm then you can install on just one server after which the CopyMove files are automatically propagated to the other servers in the farm.
TIP: Login as domain administrator or login using the same account used by the IIS application pool for the SharePoint Central Administration Web site. |
| 3. | Extract the CopyMove ZIP archive to a local folder on the SharePoint server. |
| 4. | From the Windows Server start menu, launch the SharePoint 2013 Management Shell. |
| 5. | Add the solution packages sharepointproducts_platform2013.wsp, sharepointproducts_copymove2013.wsp, sharepointproducts_platform2010.wsp and sharepointproducts_copymove2010.wsp to the SharePoint farm using the Add-SPSolution PowerShell command:
Add-SPSolution <Full path to the sharepointproducts_platform2013.wsp file>
Add-SPSolution <Full path to the sharepointproducts_copymove2013.wsp file>
Add-SPSolution <Full path to the sharepointproducts_platform2010.wsp file>
Add-SPSolution <Full path to the sharepointproducts_copymove2010.wsp file>
For example:
Add-SPSolution C:\CopyMove2013\WSP\sharepointproducts_platform2013.wsp
Add-SPSolution C:\CopyMove2013\WSP\sharepointproducts_copymove2013.wsp
Add-SPSolution C:\CopyMove2013\WSP\sharepointproducts_platform2010.wsp
Add-SPSolution C:\CopyMove2013\WSP\sharepointproducts_copymove2010.wsp |
| 6. | Open the SharePoint 2013 Central Administration site. |
| 7. | Navigate to System Settings and click the Manage farm solutions link to open the Solution Management page shown in the following screen shot:
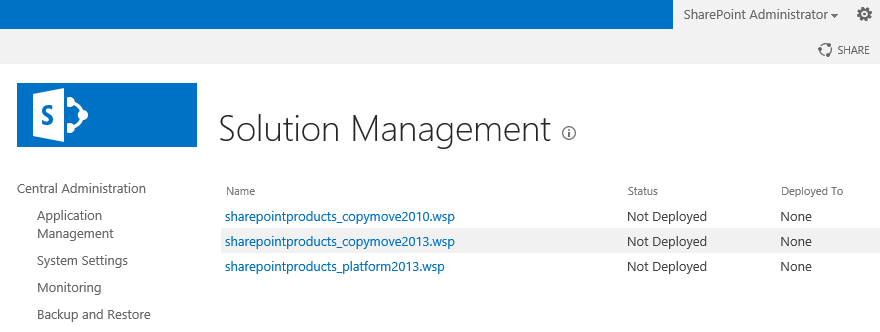 |
| 8. | Click the sharepointproducts_platform2013.wsp link to open the Solution Properties page for the clicked solution.
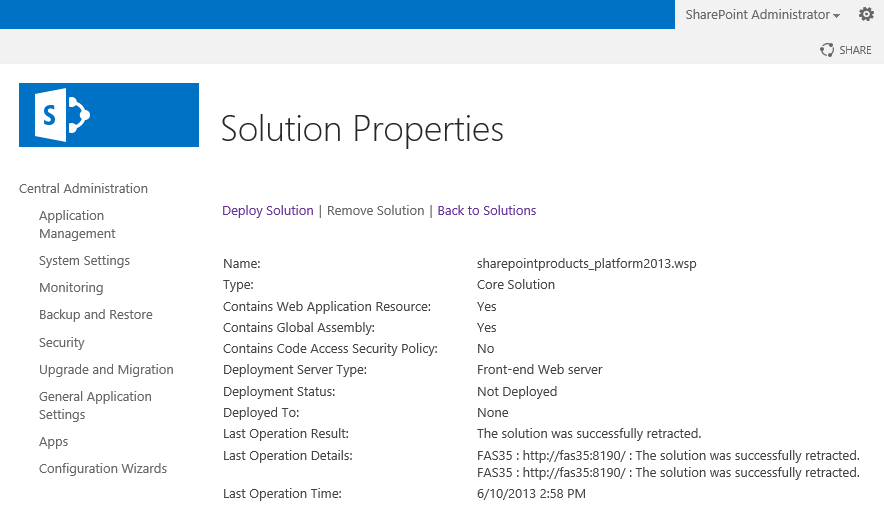 |
| 9. | Click the Deploy Solution link to open the following page from where a solution deployment job can be created.
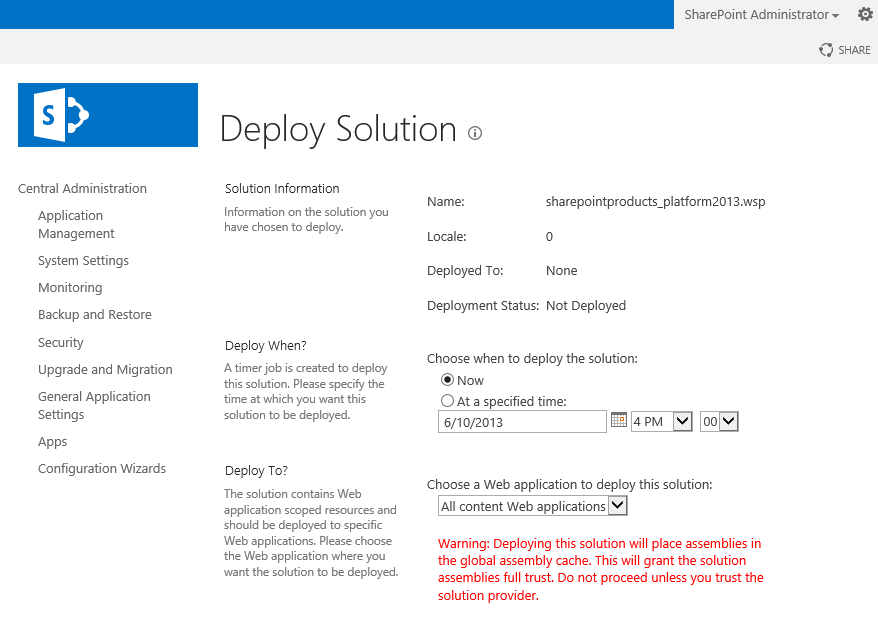 |
| 10. | Now, create a deployment job that deploys the solution to all content Web applications in the farm. To do this, select All content Web applications in the Deploy To drop-down and click the OK button. |
| 11. | Next, create a deployment job that deploys the solution to the Web application hosting SharePoint Central Administration. To do this, select the URL of SharePoint Central Administration in the Deploy To drop-down and click the OK button. |
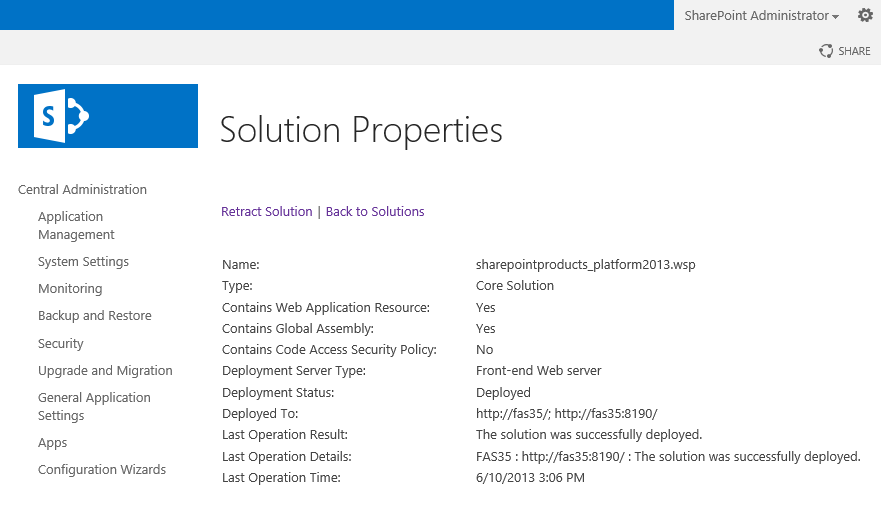
| 12. | Use the Solution Properties page to very that the solution was deployed without errors. The Deployment Status row must say Deployed, the Deployed To row should include the URLs of all Web applications in the farm and the Last Operation Result row should say The solution was successfully deployed.
 |
| 13. | Repeat steps 7 to 12 for the sharepointproducts_copymove2013.wsp solution package. |
| 14. | Optionally also repeat steps 7 to 12 for the sharepointproducts_platform2010.wsp and sharepointproducts_copymove2010.wsp solution packages. |
|